CereusTransporter Plugin Now Supports Elasticsearch 8 and Elastic Cloud 8!
🌟 Exciting Update: CereusTransporter Plugin Now Supports Elasticsearch 8 and Elastic Cloud 8! 🌟
Calling all Cacti users! We’re thrilled to announce an important update to the already amazing #CereusTransporter plugin! 🌵🚀
You’ve experienced how effortlessly CereusTransporter sends your Cacti data to popular tools like #Boson and #InfluxDB. We’ve expanded its functionality to support #Elasticsearch and #ElasticCloud! This update will elevate your data analytics and monitoring capabilities to new heights.
🔗 CereusTransporter Enhanced Features:
1️⃣ Expanded Compatibility: Besides Boson and InfluxDB, CereusTransporter now seamlessly integrates with Elasticsearch and Elastic Cloud, ensuring smooth data transfer and integration.
2️⃣ Improved Analytics: With Elasticsearch and Elastic Cloud support, you can unlock even more potential from your Cacti data by leveraging advanced analytics and visualization features.
📣 Calling Testers: We’re looking for enthusiastic testers to help us ensure that the new features of CereusTransporter work flawlessly! If you’re a Cacti user eager to contribute to the plugin’s development, join our test group and enjoy early access to the enhanced features while sharing your valuable feedback.
🔗 Connect with us on LinkedId and get in touch to join our test group or to learn more about the updated CereusTransporter plugin!

CereusTransporter 1.0 has been released!
Exciting news for all Cacti users!
I am thrilled to announce the release of the CereusTransporter 1.0 plugin for Cacti. This powerful plugin lets you easily send data from Cacti to InfluxDB2 for advanced monitoring and analysis.
With CereusTransporter, you can easily monitor and analyze data from multiple sources in near real-time, giving you a complete picture of your network performance.
Built Dashboards in Grafana, or use Machine Language to identify issues before they occur.
If you need support or have any questions about the CereusTransporter plugin, please contact us.
Download the plugin today and take your network monitoring to the next level!
CereusTransporter for Cacti supports InfluxDB2
CereusTransporter for Cacti now supports InfluxDB2 and token-based authentication. Data from Cacti can now be sent to InfluxDB2, a time series platform where you can collect and store long-term data from multiple sources.
CereusTransporter is a plugin for Cacti that can send data to databases or platforms like Bosun, InfluxDB1/InfluxDB2, or OpenTSDB. The Cacti data then can be further processed to create Dashboards, integrated into existing alarm tools, or just kept for BigData analysis.
The upcoming release of CereusTransporter 1.x will add InfluxDB2 support. Future versions add the ability to define custom tags, filter data to be sent, and specify multiple target platforms.
Look here for the plugin page: CereusTransporter
If you need commercial support with your Cacti installation, Contact us today !

NEW Cacti Beginners Guide Book for Cacti Version 1.0
My new book is finally released. It’s a complete re-write to Cacti 1.x

End-User Monitoring with Alyvix
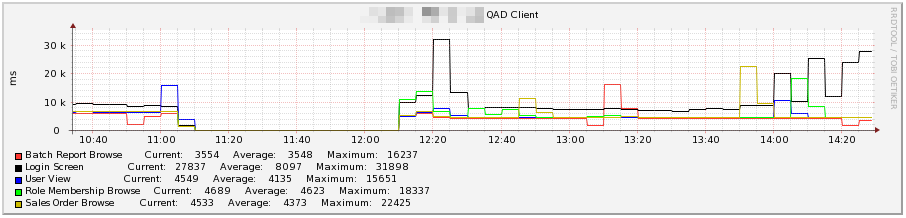
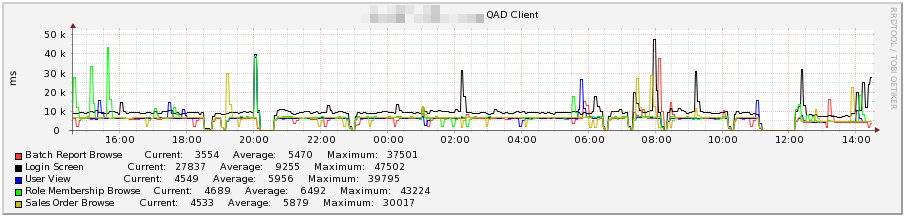
Ever heard of Alyvix ? That’s a free environment for monitoring application performance by emulating an end-user interacting with the real application. I’ve created a monitoring agent for the QAD/ERP software that allows one to measure the login time as well as the performance of different programs and queries throughout the day from an end-user perspektive. The data can be retrieved from the Monitoring workstation using a REST gateway in order to be displayed within Cacti.
Look at the attached graphs for the result:
Installing InfluxDB on CentOS 7
A new InfluxDB on CentOS HowTo has been created, describing the installation steps required to get a new influxdb instance running on a CentOS 7 based system.
Visualizing Cacti Data with Grafana and InfluxDB
Introduction
Cacti has a great polling engine for retrieving SNMP, WMI and other data from a lot of different devices. It generally stores the data into RRD files which are then being used to create the actual graphs for the users to view. By using InfluxDB together with Grafana as a frontend, it is possible to built an easy to use performent dashboard for end-users utilizing the Cacti polling engine.

Cacti Appliance for SMB or remote offices
We’re currently in the process of developing Cacti Appliance for SMB or remote offices for monitoring a large number of data-sources on-site.

CereusAgent has been released
CereusAgent v1.03 has been released. This new exciting addon for Cacti allows you to create as many stand-alone pollers as you require while being able to centrally manage these. No permanent connection is required after the initial configuration/setup so you can place a poller on a customer site ( e.g. SOHO, remote offices ) and collect the data once a week.

Upgrading Thold to the latest version
Sometimes during the upgrade process, not all required columns or table may have been added to the database. This error may manifest itself with an “Error: Save failed” message when trying to save changes to a device.
A possible fix to this is to manually call the upgrade.php script. To do this, go to the command line and change to the thold plugin. Then call the upgrade script:
cd /path/to/cacti/plugins/thold
php extras/upgrade.php
Then re-try saving a device. You will see the following messages:
Faking Low Thold Version
Running Thold Upgrade
Upgrade Complete